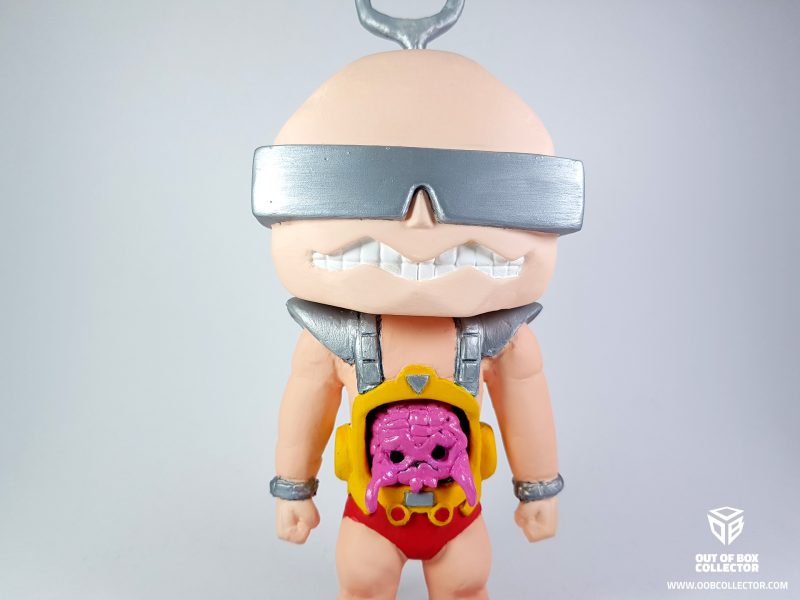
Hi everyone! Here is my first custom pop figure of the awesome villain, Krang, from the Teenage Mutant Ninja Turtles. I wanted to enter the Custom Pop Contest at the Funatics Christmas Party 2018 and among my other ideas, this is what I chose to do. This figure was one of the five winners from the custom contest.
*I recorded my full process on how I cut, sculpted, and painted the custom Pop, unfortunately, my hard drive died. I lost all my files including the build videos. I was only able to salvage the first 1/4 of the build. I’m still thinking if I’ll upload the video even if it’s not complete.
Finished product first then we’ll move at the “how it’s made” part.


How it’s made

First, this is my reference design for the Krang Pop. I know that it would be difficult to sculpt the head but I’ll try to be as close to the original design as I can.
The Design

Here’s my draft. Yes i know… It’s poorly photoshopped but I just needed to see the rough idea of what I had in mind.
Starting Pop

I started with a 6″ Armored Titan Pop! It’s a pop that has the basic features that I need. I’ll use this for the robot body.

Next, I need a small head pop for the small Krang brain. All I have is a Thor Pop Keychain.
DISASSEMBLY

I used hot water to melt the glue of the big pop. I used a Stanley knife to cut Thor’s head.

I used a Dremel to cut the body of the 6″ Pop and I also removed the hair of Thor. Now it’s just a rounded Pop head.
SCULPTING

I mixed an epoxy putty and sculpted the body. I added a crumpled, rounded shaped paper inside the body to create the cavity for the Krang brain. I also noticed that the arms are now too short for the body. I decided to cut the arms in half and extend it… but I’ll do it at a later time… I will just focus on the body for now.

Back view. I left it overnight to dry.

After the epoxy dried, I cut the cavity using a Dremel and removed the crumpled paper inside… and I test fitted the small head. Fits great!

I started to mold the brain.

Looks cute!

I now moved on to sculpting the extended arms, the body and sculpting the head. I cut the head of the figure to create a cone-like shaped top then I sculpted the head. The body still looks a bit flat right now but I’ll add in the details after.

It’s starting to take shape. 🙂 I added 2 plastic for the shoulder pads thing. The Epoxy clay needed a support underneath. It won’t hold on its own. The plastic can be easily removed after the epoxy clay have dried.

The Back. It still needs a bar and a few small details.
I then sanded the figure until smooth. This process took most of my building time.
Details and Primer

After sanding and making the pop as smooth as I can… I can now move on with the primer… I decided to use a gray spray primer for the entire figure.
Since this is the first time that I made a custom pop figure, I didn’t know that the light colored paint doesn’t show well over gray primer. I then sprayed white primer on the lighter parts of the figure.

So far it looks good! I’m very happy at this point. Now the fun part… PAINTING!
Painting

I started with the metallic silver paint. Why did I start with the silver paint you ask? Well… this is the only paint that I currently have during this time. This was a left over paint from a previous project of mine. The glasses looks great! The silver on gray primer looks amazing.

Now the pads, straps, and the inside of the Krang brain seat.

I painted the Krang brain. looks awesome! I also used a shiny clear coat for this since Krang is suppose to look slimy.

Now painting the body. This is the most difficult part to paint. I had to make sure that everything is well painted. I tried to minimize the paint smudges and the paint brush marks. I also masked the edges for a cleaner look.

This is what it looks like after painting. I was very disappointed at my work at this point since it doesn’t look smooth. I have yet to spray this with a clear matte coat though. I was hoping that it would make my work look a little bit more smooth and hide the imperfections.

After spraying it with a matte clear coat, the figure looked so much better! It’s not perfect but for my first custom pop, it’s really not bad.
And we’re done! Here is the finished product! After the clear matte coat, the paint looked so much nicer! The entire figure looked better. I was very happy with the outcome of this project, even if it’s not perfect.

More photos of Krang.

Friends for scale.

This is what it looks like with the little Krang brain out of the seat.

additional photo of Krang with D.Va’s Meka.
Funko Funatics PH Custom Contest

I was one of the 5 chosen winners of the custom contest! They all have great pieces and I wasn’t expecting on winning. Thanks Funko Funatics PH!

Here’s the Chairman of Fun, Mike Becker, holding my work. I also gave it to him as my way of saying thank you.
– End –


